RootflowRT v.2.8
Imaging
in the Baskin Lab
Image
Quality
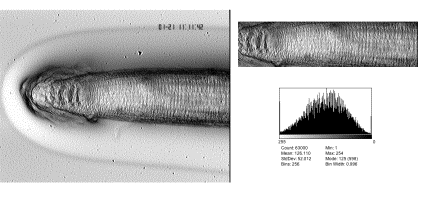
The
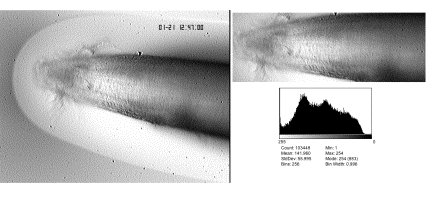
software’s ability to make accurate motion estimation is integrally dependent on
image quality. Good images have a histogram that is spread out and there is good
focus throughout the root.
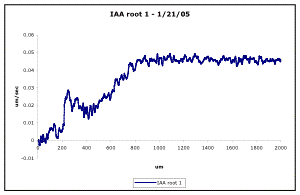
Fairly Good Root Image:
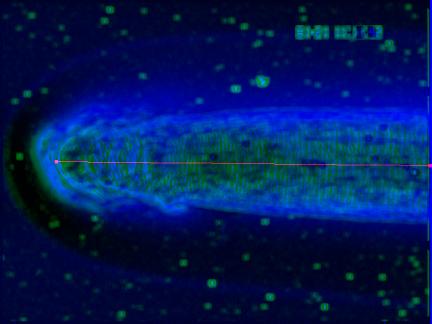
Motion Mask Image
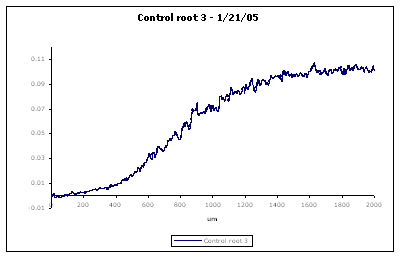
Resulting Velocity Profile
Very Poor Root Image:
Motion Mask Image

Resulting Velocity Profile
Imaging
Procedures
1.
Plates
grown on agar can be imaged either from the top using the dimple lids or from the
back through the agar.
2.
If
imaging Control roots, which will grow fairly fast, set the inchworm in Step
mode to travel 400um. If imaging slow growing roots
such as for IAA and 2,4-Dtreatments, then set the
travel distance to 300um.
3.
The
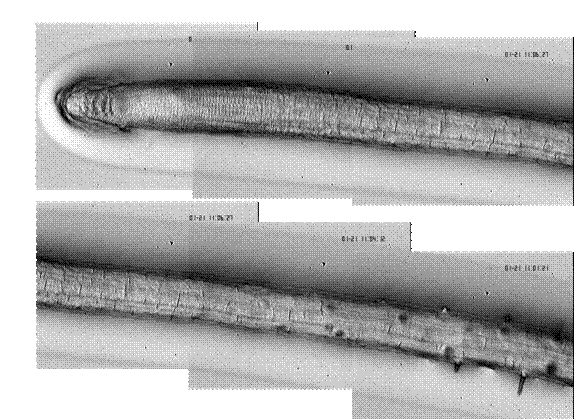
best way to obtain images that will yield the best data is to first get the best
focus possible across the entire length of the root and then adjust
the light source of the microscope to obtain the best spread of gray
values from white to black. Note, if you are imaging through the agar, the
image may appear to have too much contrast, just try your best.
4.
In
Waheeda’s macros of Scion Image, <c>
will initiate the taking of a stack initially set as stack ‘1’, ‘9’ frames ‘15’
seconds apart. These can be changed manually after hitting <c>.
5.
Also
in Waheeda’s macros, <b> will take a
background image for the stack number entered. Eg.
Stack0003Back 0001. This is appropriate if the background mosaic method is
being used.
Setting
up a Root for Imaging using Scion Image
1.
Focus
on the root tip so that the end of the root is about 2/3rds across
the full screen. (Note, this is a rule of thumb that will have to be adjusted
depending on how fast growing the root is and how speedily you set up the whole
root to begin taking stacks. These factors will affect the position of the root
tip by the time you are imaging it. The QC should be clearly visible and the
root tip should take up over half of the frame for successful velocity analysis
and mosaicing.)
2.
Loosen
the inchworm holder and manually move the inchworm and stage so that it is making
full contact with the stage and the root in the same position as in step
1. (Caution! The inchworm is delicate. Please be gentle when bringing it into contact
with the stage. Do not bang the stage onto the inchworm. Be sure the stage is counterweighted
before starting to work with the inchworm.)
3.
Reverse
the inchworm in Step mode the appropriate travel distance until the root
maturation zone. Adjust the stage so that it is making full contact with the inchworm
during this process.
4.
Begin
taking frames of the root stack using <c> macro by selecting LoadMacros in Scion Image and choosing Waheeda’s.
This will be stack 1.
5.
Travel
forward using the inchworm in Step mode and take stack 2. Repeat until
the root tip stack is reached. If everything goes well, the root tip will not
have grown out of frame by the time you reach it.